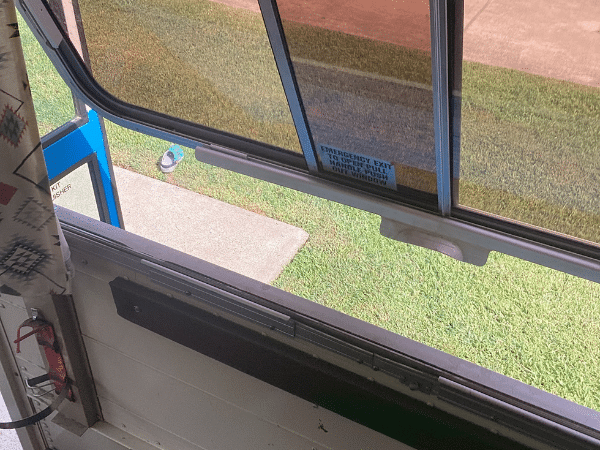
This was one of those tasks I figured would take an afternoon but ended up being a bigger deal than expected. Removing school bus windows sounds straightforward until you actually start looking at how they’re attached, and then you realize there are like four different methods depending on the bus manufacturer and year.
The short answer is that most school bus windows are held in by a rubber gasket, rivets, or a combination of both, and they come out easier than you’d think once you know the method. For rubber gasket windows, you push from the inside and the whole pane pops out. For riveted windows, you drill out the rivets with a 1/8-inch drill bit, then pry the frame loose. Either way, a single person can remove all the windows on a full-size bus in a day, maybe a day and a half if you’re dealing with rivets and being careful. The tools you need are basic — a drill, a flathead screwdriver, a rubber mallet, and maybe a putty knife. Once they’re out, you’ve got decisions to make about whether to seal those openings with metal, insulated panels, or something else entirely.
“What’s the easiest way to get the bus windows out when they have rivets??”
Alright so riveted windows are the ones that trip people up. I get it. You look at a row of rivets and think you need some kind of industrial setup. You don’t.
Here’s what I found works best after watching probably a dozen people do this on YouTube and talking to a builder at a meetup who’d done three buses. You grab a drill with a 1/8-inch bit (or whatever matches the rivet size) and drill straight through the center of each rivet head. You’re not trying to drill through the whole rivet, just the head. Once the head pops off, the rivet body pushes through easily. Some people use a punch to knock the remaining shaft out, but honestly most of the time it just falls through once the head is gone. (See our guide on What Is the Best Way to Paint a School Bus? for more on this.)
The trick that builder told me about was to go slow and use a new, sharp drill bit. Dull bits wander on the rivet head and chew up the surrounding metal. He said he’d swap in a fresh bit every 15-20 rivets or so. Sounded excessive to me at first, but he pointed out that a pack of 1/8-inch bits is like six bucks at Harbor Freight. Cheap insurance against scarring up your bus frame.
Now, some buses have a combination situation where there’s a rubber gasket AND rivets. The gasket holds the glass, the rivets hold the frame. For those, you drill the rivets first, then pry the whole assembly, frame and glass together, out of the opening. Don’t try to separate the glass from the frame while it’s still in the bus. Get the whole unit out, set it on the ground, and deal with it from there.
One more thing. Wear gloves. I know it sounds obvious but I read a post from a guy who sliced his palm open on a window edge because he was pulling panes out barehanded and got overconfident on the eighth one. Safety glasses too, because drilling rivets throws tiny metal shavings everywhere.
“Why would you build a bus and not remove the bus windows?”
I’ve seen this question pop up in comment sections a lot, usually under builds that have these gorgeous interiors with all the original windows still in place. And people ask it like it’s crazy to keep them. But there are actually solid reasons.
First, windows give you natural light. A lot of it. When you seal up a bus and replace windows with insulated panels, the interior gets dark fast. You’re basically building a metal cave unless you put in a ton of LED lighting. I’ve been in a couple builds where the owner removed every single window and honestly it felt a little claustrophobic. Not terrible, but noticeably different from the builds that kept windows along one side or left the back windows in.
Second, ventilation. We talked about this in the insulation guide, but operable windows solve a lot of moisture problems. Running a MaxxAir fan is great, but being able to crack three or four windows on a nice day is something you can’t replicate with fans alone.
Third, some people just like the look. The bus-style windows are part of the aesthetic for certain builds, especially the ones going for more of a mobile cabin vibe rather than trying to hide the fact that it’s a bus. I talked to a couple at a campground once who kept all their windows, just tinted them really dark, and the inside looked incredible with the light coming through. They said insulation was harder with the windows in, which is true, but they were spending most of their time in the Southwest so extreme cold wasn’t really their concern.
The trade-off is always insulation. Every window is a thermal weak point. Glass has almost no R-value. If you’re planning to spend winters in cold climates, removing most of the windows and insulating those openings is going to make a huge difference in how warm your bus stays. But if you’re a fair-weather traveler or you’re mostly in mild climates, keeping some or all of the windows is a perfectly valid choice. There’s no rule that says you have to remove them all.
“what kind of material did you put over the windows? That’s been my biggest thought on how to get rid of the bus style windows.”
This is where it gets interesting because I’ve seen about six different approaches and they all have pros and cons.

The most common method I’ve come across is cutting sheet metal to fit the window openings and welding or riveting it in place. This gives you a flush, permanent seal that looks factory from the outside. Sixteen gauge steel is what most builders use, sometimes 18 gauge if they’re trying to save weight. You cut your piece slightly larger than the opening, bend the edges to create a lip that overlaps the bus body, and rivet it in. Then you seal the edges with an automotive sealant like Sikaflex or Dicor lap sealant. Sikaflex seems to be the go-to from what I’ve gathered. It stays flexible, handles vibration, and doesn’t crack over time like silicone caulk will.
Some people skip the metal entirely and use rigid foam board capped with a thin aluminum or steel skin. The advantage here is that you’re insulating and sealing the opening in one step. You sandwich insulation between an outer metal panel and an inner finishing panel and the whole thing becomes part of your wall. I watched a build video where a guy used 1.5-inch polyiso foam board with aluminum sheeting on both sides, and it looked completely professional.
Then there’s the fiberglass approach. Some builders use fiberglass panels or even do a fiberglass layup right over the opening. This is lighter than steel and won’t rust, but it’s messier to work with and harder to get a smooth finish if you haven’t done fiberglass work before.
The budget option I’ve seen is just plywood. Cut plywood to fit, seal it with exterior paint, caulk the edges. It works. It’s not the prettiest solution and it won’t last as long as metal, but I’ve seen plenty of builds rocking plywood window covers that are holding up fine after a few years. Just make sure you use exterior-grade plywood and seal every edge, because regular plywood will soak up moisture and delaminate. (See our guide on How to Paint a School Bus (DIY vs Professional) for more on this.)
Whatever material you choose, the key thing is that the outside needs to be weather-sealed and the inside needs to tie into your insulation and wall paneling. A window opening is essentially a hole in your house. Treat it that way.
“This may sound like a bit of a dumb question but how were you able to close or seal up all of the original openings of the school bus windows?”
Not a dumb question at all. This is actually the part that most build videos gloss over, and it’s arguably the most important step because a bad seal means water leaks, and water leaks mean rust, mold, and all the problems you were trying to avoid.
Here’s the process I found that most experienced builders follow. Once the window is out, you clean the opening thoroughly. Scrape off any old gasket material, old sealant, surface rust, all of it. Wire brush the metal, hit it with a rust converter if there’s any orange showing, and wipe it down with rubbing alcohol or acetone so you’ve got a clean bonding surface.
Next, you dry-fit your panel. Whether it’s metal, foam, fiberglass, whatever, get it in there and make sure it fits tight. Some builders leave about a 1/4-inch gap around the edges specifically for sealant, and that’s a smart move. You don’t want the panel so tight that there’s no room for the sealant to do its job.
Then comes the sealant. Sikaflex 221 or Dicor self-leveling lap sealant are the two I see recommended constantly. Sikaflex is more of a construction adhesive that also seals. Dicor is designed specifically for RV roof and seam sealing. Both work. Run a bead around the entire perimeter of the opening before you set your panel in, then press the panel into the sealant. Some people rivet first and seal second, but I think the smarter approach is to bed the panel in sealant and THEN rivet through it. That way the sealant fills any gaps the rivets create. (See our guide on Can You Raise the Roof on a School Bus? for more on this.)
After the panel is riveted and bedded in sealant, run another bead around the outside perimeter where the panel meets the bus body. Smooth it with your finger or a caulk tool. This outer bead is your first line of defense against rain, road spray, and everything else.
On the inside, you’ve got your insulation cavity now. Fill it with spray foam, rigid board, whatever matches the rest of your wall insulation. Then your interior wall paneling goes over the top and you’d never know there was a window there.
The thing I want to emphasize is that this is a permanently sealed opening in a vehicle that drives through rain, gets pressure-washed by highway spray, and sits in sun that expands and contracts the metal every day. Sealant quality matters. I read a thread where a guy used regular silicone caulk from the hardware store and had leaks within six months because the silicone couldn’t handle the vibration and expansion. Spend the extra money on automotive or RV-grade sealant. It’s not the place to cheap out.
Related: What Is the Maximum Legal Height for a Converted Bus?
Related: How to Raise the Roof on a School Bus (Step by Step)
So here’s the takeaway
Removing bus windows is honestly one of the more satisfying parts of the early build. You go from looking at a school bus to looking at something that could actually become a home. The removal itself isn’t hard, whether you’ve got rubber gaskets or rivets, you can knock it out in a day with basic tools.
The real work is in what comes after. Deciding which windows to keep, choosing your panel material, and getting those seals right. I’d spend more time on the sealing step than any other part of this process. A ten-minute rivet drill-out is nothing compared to dealing with a water leak behind your walls two years down the road.
If you’re still in the early stages and haven’t dealt with the seats yet, check out the article on removing school bus seats because that’s usually the step right before this one. And if you’re pulling windows specifically to insulate, the complete insulation guide covers how to handle those openings as part of your overall insulation strategy. Take your time on this step. It’s one of those things where doing it right the first time saves you from a headache later.
aprjza
6hp2tr