

The bathroom is one of those builds that sounds simple until you’re standing in a gutted bus with a tape measure trying to figure out how to fit a shower, a toilet, and a sink into a space the size of a closet. But people do it all the time, and the results can be surprisingly comfortable if you plan it right. (See our guide on Can You Put a Bathroom in a School Bus? for more on this.)
Building a skoolie bathroom comes down to six decisions: wet bath or dry bath layout, which toilet type (composting wins for most people), how to build the shower pan, what materials to waterproof the walls with, how much ventilation to install (more than you think), and how to route your gray water drainage underneath the bus. The whole project runs anywhere from $500 for a budget DIY setup to $3,000+ if you’re going premium. Most of the cost isn’t in fancy finishes — it’s in waterproofing and plumbing materials that keep everything from rotting out in two years.
Wet Bath vs Dry Bath: Which Layout Works Better?
I kept seeing this debate come up in every single build forum I spent time on, and for a while I didn’t even understand what the terms meant. So let me just lay it out plain. (See our guide on How to Build a Skoolie Kitchen That Actually Works for more on this.)
A wet bath is a single waterproofed room where the shower, toilet, and sometimes the sink all share the same space. When you shower, everything gets wet. The entire room is basically a shower stall. A dry bath separates the shower into its own enclosed area, so your toilet stays dry when you’re showering.
In a short bus, a wet bath is almost always the move because you don’t have the square footage to give the shower its own walls. I looked at probably 40 or 50 floor plans while researching this, and the pattern was clear — builds under 25 feet almost always went wet bath, builds over 30 feet could go either way. (See our guide on 7 Skoolie Floor Plan Ideas for Every Bus Size for more on this.)
Now someone asked a question that matters here: “What is a dry bath? I’m thinking of going RV life but I am disabled and walk with a walker.” A wet bath floor stays slippery for a while after you shower. If you’re using a walker, that’s a real safety issue. A dry bath keeps your toilet area dry, gives you a stable surface, and you can mount grab bars without worrying about them being in the splash zone. Some accessible builds I came across used a curtain instead of a door, which eliminates the problem of swinging a door open while maneuvering a walker in a tight space.
If you have the room, dry bath. If you don’t, wet bath with serious attention to non-slip flooring and grab bar placement. That’s really the answer. (See our guide on 6 Best Flooring Options for a School Bus Conversion for more on this.)
Choosing a Toilet (Composting, Cassette, or Traditional)
“What kind of toilet?” is probably the second most common question I see after “how much does a conversion cost?” And the follow-up is almost always “how do you dispose poops and waste materials?” So let’s just get into both.

There are three realistic options. Composting toilets are what most people end up with. A Nature’s Head runs about $960, an Airhead about $1,100, and you can build a DIY version with a urine diverter and a five-gallon bucket for under $100. They separate liquids from solids, the solids mix with coconut coir or peat moss and break down over time, and a small 12V fan vents any odor outside through a hose. No water, no plumbing, no black water tank. You empty the solids bin every 3-6 weeks and the liquids jug every couple of days.
I was at a bus meetup last year talking to a couple who’d been full-timing for three years with a Nature’s Head, and the guy told me the only time it ever smelled was the first week when he’d forgotten to connect the vent fan. Once the fan was running, nothing. His wife said their composting toilet smelled less than the flush toilet in their old apartment. I don’t know if I’d go that far, but the point is these things work better than most people expect.
Cassette toilets are the budget option — a Thetford Porta Potti runs $100-150. It’s a portable unit with a removable waste tank that you take to an RV dump station every few days. Cheaper upfront but more maintenance and you’re dealing with chemical treatment. Some people don’t mind the routine. It works fine, it’s just less convenient long-term.
Traditional flush toilets with a black water tank are what you’d find in a regular motorhome. They work, but you’re adding a holding tank, sewer plumbing, a dump valve, vent pipes, and regular dump station visits. Most skoolie builders look at all that and just say no thanks.
For waste disposal — composting toilet solids go in a trash bag when the bin is full. By that point the material looks and smells more like dirt than anything else. Liquids can go in any regular toilet, or diluted on the ground in rural areas. Cassette tanks get dumped at RV dump stations. Apps like Sanidumps and iOverlander map every dump station near you.
Building the Shower Pan
This is the part where I saw the most variation between builds, and honestly, the most creative problem-solving too.
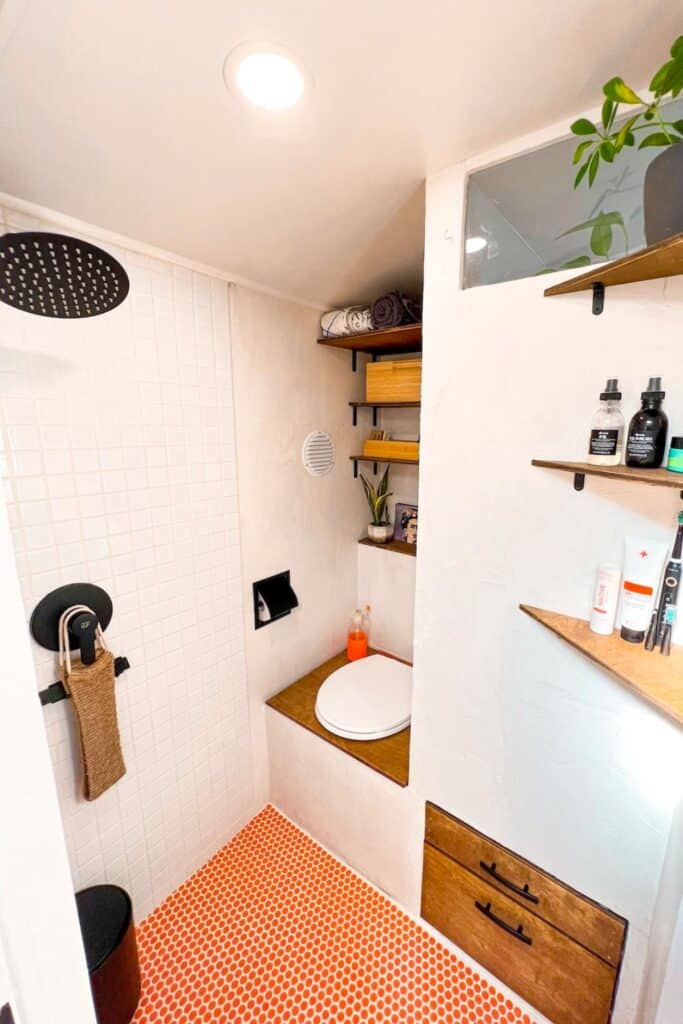
The basic idea is you need a waterproof basin on the floor that collects water and routes it to a drain, which connects to your gray water system underneath. There are a few ways to get there.
Option one is a premade shower pan. You can buy RV shower pans in standard sizes — 24×32 inches is common — and they just drop into place. They’re lightweight, they already have a drain fitting built in, and they’re designed for vehicles. This is the easiest route by far. The downside is the sizing. Your bathroom might not be a standard size, and then you’re either adjusting your layout to fit the pan or cutting the pan to fit your layout, which kind of defeats the purpose.
Option two is building a custom pan from scratch. Most builders do this with plywood as a base, then a waterproof membrane, then either tile or a fiberglass coating on top. The plywood gets framed with a slight slope toward the drain — about a quarter inch of drop per foot. The drain fitting goes through the floor and connects to PVC pipe underneath running to your gray water tank.
Option three, and this is the one I thought was clever when I first saw it, is using a stock tank or galvanized tub as the shower basin. I saw a build where someone cut a drain hole in a small galvanized tub, sealed it with marine-grade silicone and a standard drain fitting, and framed around it with cedar. Looked incredible and it was basically leak-proof because the tub is one solid piece of metal. Maybe $80 total in materials.
Whatever approach you take, the drain connection underneath is the same. Standard shower drain to 2-inch PVC pipe, through the bus floor, into the gray water tank. PVC cement on every joint. Pipe strapping to secure the run to the underside of the bus so it doesn’t bounce around while you’re driving.
Waterproofing Everything
“Can you put a bathroom in a school bus?” Yes, you can. But the bathroom part isn’t what makes it hard — the waterproofing part is.
Water is going to get everywhere in a bus bathroom. Shower spray, condensation, splashing from the sink. And you’re putting all that water inside a metal box that will rust, next to wood framing that will rot, with insulation that will grow mold. Every surface needs to be either waterproof or protected by something that is.
For the shower walls, you’ve got a few options and I want to address something specific here because I keep seeing it asked. “How does the shower tile not crack when you drive and hit bumps?” Short answer — it doesn’t crack if you do it right. The bus suspension absorbs road vibration, and the tile is bonded to a solid substrate that moves with the bus as one unit. The key is using flexible thinset mortar and flexible grout, not the rigid stuff you’d use in a house. And keep the tiles small — subway tile or mosaic sheets. Large format tiles are more likely to crack because there’s more surface area under stress.
But honestly, most builders skip tile entirely for the shower walls and go with FRP panels (fiberglass reinforced panels, same stuff commercial restaurant kitchens use) or vinyl plank mounted vertically. Both are waterproof, both handle bus movement without any issues, and they’re way faster to install than tile. I’ve seen beautiful shower walls done with vertical shiplap-look vinyl that probably took an afternoon to put up. Tile in the same space would’ve been a weekend project minimum.
For the area behind the walls — between your finish material and the bus skin — closed-cell spray foam handles both insulation and vapor barrier in one shot. If you’re using rigid foam board instead, tape every seam with waterproof tape. Zero gaps.
The ceiling above the shower needs attention too, and this is one people forget. Steam rises. If your bathroom ceiling isn’t moisture-resistant, you’re going to get condensation dripping down. FRP panels work. Painted marine plywood works. Regular drywall does not — it’ll sag and grow mold within months.
Ventilation (You Need More Than You Think)
Alright so this might be the section that matters more than any other for long-term livability, and it’s the one most first-time builders underestimate. I can’t overstate this. You need more ventilation in your bus bathroom than you think you do.

A bus is a sealed metal box. When you take a hot shower in a sealed metal box, you create a massive amount of moisture. If it doesn’t go outside through a vent, it goes into your walls, your ceiling, your insulation, and eventually it becomes mold. I read a post from a builder who did everything right with waterproofing and still got mold behind his bathroom wall after six months. Turned out his only ventilation was a small computer fan in the ceiling. Wasn’t even close to enough.
At minimum you want a proper vent fan in the 50-80 CFM range, vented through the roof to the outside. A MaxxAir or Fantastic Fan works great and a lot of builders already have one elsewhere in the bus, so adding one above the bathroom is straightforward. These pull damp air out and create negative pressure that draws fresh air in.
If you’ve got a wet bath, the vent fan is doing double duty as your primary moisture removal. Run it during your shower and for at least 15-20 minutes after. Some people wire theirs to a humidity sensor so it kicks on automatically.
And here’s something I didn’t think about until someone mentioned it in a build thread — if you have a composting toilet in the bathroom, it has its own vent fan running 24/7. So you’ve got two exhaust sources in one room, which is good, but you need a gap under the bathroom door or a vent in the door so air can actually flow in. Sealed bathroom plus two exhaust fans with no fresh air intake means neither fan works efficiently. I thought that was a really good catch.
One more thing — if you’re in a humid climate, running a small dehumidifier in the bus helps too. Even a cheap $30 Peltier dehumidifier pulls surprising amounts of moisture out of the air. Not as a replacement for proper vent fans, but as an extra layer on top of them.
Related: Is a Propane or Electric Stove Better for a Skoolie?
Gray Water and Drainage
So you’ve got water coming out of your shower drain and your sink drain. That water has to go somewhere, and in a bus, it goes into a gray water tank mounted underneath.

The plumbing is pretty straightforward. PEX tubing handles your supply side — cold water from the freshwater tank runs through a 12V pump, splits to your fixtures and water heater, hot water runs back to the shower and sink. For the drain side, gravity does the work. Your drains connect to 1.5 or 2 inch PVC pipe that slopes downward through the bus floor to a gray water tank strapped to the underside of the frame.
Most people go with a 20 to 40 gallon gray water tank. Too small and you’re dumping constantly. Too big and you’re hauling hundreds of extra pounds everywhere. I found that 30 gallons is the sweet spot for most full-time couples — a few days between dumps if you’re conservative with water.
The tank mounts to the steel frame with strapping or a custom bracket. Keep it as close to the drain exits as possible to minimize pipe runs. The tank needs a dump valve on the bottom for RV dump stations and a vent on top so it doesn’t create a vacuum that slows your drains.
Here’s a thing I learned that I wish I’d known earlier — your gray water pipes underneath the bus are exposed to the weather. In winter, that means freezing. Water sitting in an exposed pipe at 20 degrees is going to freeze and crack, guaranteed. Two ways people deal with this: heat tape wrapped around the pipes and tank with insulation over it, or running your drain lines steep enough that water doesn’t sit in them. Most full-timers who head north in winter use both.
One quick note on routing — try to plan your bathroom and kitchen on the same side of the bus if you can. That way all your drain lines share a common path to the gray water tank instead of running pipes across the full width of the bus. Every extra fitting and every extra foot of pipe is one more thing that can leak or freeze or get knocked loose by a rock on a dirt road.
After digging into all of this for longer than I expected to, here’s where I landed. The bathroom is probably the most technically demanding part of a bus build, but none of the individual pieces are that complicated on their own. Pick your layout based on your space and your needs. Go composting toilet unless you have a specific reason not to. Build a shower pan with proper slope. Waterproof everything aggressively, especially the surfaces you can’t see. Install more ventilation than seems necessary. And keep your gray water plumbing as short and simple as possible. The builds I saw that had problems almost always cut a corner on one of those things — usually waterproofing or ventilation. The ones that were still going strong years later just did those boring steps right from the start. That’s really the whole story.
1 thought on “How to Build a Skoolie Bathroom (Shower, Toilet, and Plumbing)”