
Winter is coming and your bus is basically a steel box on wheels. If you’ve never been through a cold season in a skoolie, the list of things that can go wrong is longer than you’d think — frozen pipes, dead batteries, condensation dripping off the ceiling onto your pillow at 3 AM.
Getting a skoolie ready for winter means tackling several systems at once: winterizing your plumbing, addressing insulation weak spots, making sure your heating has redundancy, skirting the underside if you’re staying put, prepping the engine for cold starts, and managing condensation. Skip any one of these and winter will find the gap. I learned that the hard way my first cold snap, when I woke up to a frozen gray water line and a bus that smelled like a swamp because nothing was draining.
Winterizing Your Water System (Don’t Skip This)
I cannot stress this enough. Your water system is the thing most likely to ruin your winter if you ignore it. Frozen pipes don’t just stop working, they crack. And a cracked PEX line behind your wall paneling is not something you want to discover when everything thaws and your floor turns into a wading pool.

Start with your freshwater tank. If it’s mounted inside the bus, you’re already ahead of the game because your cabin heat keeps it above freezing. If it’s mounted underneath, you’ve got a problem. Some people insulate the tank with rigid foam and add a 12V tank heater pad. Others just drain it when temps drop and switch to hauling water in jugs they keep inside. Neither option is glamorous but both beat a cracked tank.
Your water lines are next. Heat tape is your best friend here. It’s basically an electric wire that wraps around your pipes and keeps them warm — runs off 120V so you need shore power or an inverter. Run it along any plumbing that’s in an exterior wall, under the floor, or near the wheel wells. Cost is like $20-$40 per run, and honestly it’s some of the cheapest insurance you’ll ever buy.
The gray water tank is where most people get caught. It’s almost always mounted under the bus, fully exposed to the elements. You’ve got a few options: insulate it and add a tank heater, open the valve and let it gravity drain into a bucket or directly onto the ground where that’s allowed, or just be really careful about not letting water sit in there when it’s below freezing. I talked to a guy at a campground in Colorado who said he just pours a little RV antifreeze down his drains every night in winter. Keeps the P-traps from freezing and buys him peace of mind.
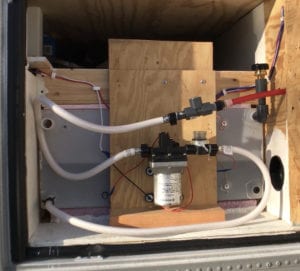
And don’t forget the water pump itself. If your pump is in an unheated compartment, wrap it in heat tape too. A frozen pump housing can crack just like a pipe.
Insulation Upgrades and Weak Spots to Address
So maybe you insulated during the build and figured you were done. Most people did a good job on the walls and ceiling but missed a few spots that only show up when it’s genuinely cold outside. Winter has a way of revealing every shortcut.

The floor is the big one. I’ve seen builds where somebody put down beautiful hardwood flooring and underneath it is maybe half an inch of rigid foam, or sometimes nothing at all. Your floor is a massive cold surface, especially if you’re parked on concrete or frozen ground. If you can’t redo the floor — and I get it, nobody wants to tear up finished flooring — at least throw down thick rugs in the living and sleeping areas. It’s a band-aid, but it helps more than you’d expect.
Windows are the other major weak spot. Single-pane bus windows lose heat like crazy. Some people make insulated window covers from Reflectix backed with foam board. You cut them to fit snug in each window frame and pop them in at night. They look a little ugly, I won’t lie, but the temperature difference is noticeable. Other people go with thermal curtains, which are easier but less effective.
The emergency exit hatches on the ceiling are cold spots too. Those things are basically thin pieces of metal with a rubber seal, and they radiate cold air downward. I’ve heard of people making insulated panels that sit over them from the inside during winter. Just make sure you can still open them in an emergency, obviously.
And check your door seals. The main entry door on a school bus was designed for kids piling on and off, not for keeping a home warm. Weatherstripping wears out fast, and you can lose a surprising amount of heat through gaps around that door. New weatherstripping is cheap, maybe $15-$30, and it takes an afternoon to install.
One thing I found kind of interesting when I was researching this — the people who converted transit buses or coach buses tend to have fewer insulation weak spots because those vehicles were already designed with passenger comfort in mind. School buses weren’t. They were designed to be cheap and durable, and “warm” was barely on the list.
Heating System Check and Backup Options
Here’s the thing about heating a skoolie in winter — one heat source is not enough. I don’t care how good your diesel heater is. If it fails at 2 AM when it’s 10 degrees outside, you need a plan B.
If you’re running a diesel heater like a Webasto or Espar, do a full service before winter hits. Clean the fuel filter, check the glow plug, run it for a while and listen for anything weird. These heaters are incredibly reliable but they’re not immortal. A service kit runs $30-$60 and takes maybe an hour. Way cheaper than a frozen night.
For backup, a Mr. Buddy portable propane heater is what most people keep on hand. They run on those small green propane canisters or you can get an adapter hose for a 20-pound tank. They throw serious heat for a small space. The catch is ventilation, you absolutely need a cracked window or a vent open when running propane inside. Carbon monoxide is no joke, and this is where I’d tell you to not mess around, get a CO detector if you don’t already have one. Two, actually. One near sleeping height and one lower.
Some people have wood stoves in their builds, which is great for ambiance and heat output. But a wood stove goes cold when you fall asleep, so it’s not really a standalone winter solution unless you want to wake up every few hours to feed it. I think of wood stoves as supplemental heat, not primary.
Electric space heaters work great if you’ve got shore power. They’re the simplest option — plug in, turn on, done. Running one on an inverter off batteries though, that’ll drain your bank fast. A 1500-watt heater running 8 hours is 12 kWh. That’s a LOT of battery.
Whatever your setup, test everything before the first freeze. Don’t be the person who discovers their heater doesn’t work on the coldest night of the year.
Skirting Your Bus for Stationary Winter Living
If you’re parked for the winter and not planning to move, skirting your bus is one of the single best things you can do. The wind that blows under a bus is brutal. It hits your floor, your tanks, your plumbing, your gray water line — basically everything vulnerable.

Skirting is just enclosing the space between the bottom of the bus and the ground. Think of it like adding walls to your crawl space. The dead air pocket that forms underneath acts as insulation.
People use all kinds of materials. Rigid foam board panels are popular because they’re cheap, insulating, and you can cut them to size. Others use plywood, heavy-duty tarps, or vinyl skirting from RV supply stores. I’ve even seen people stack straw bales around the base of the bus, which works surprisingly well and costs next to nothing if you know a farmer.
The fancier route is insulated vinyl skirting, similar to manufactured homes. Looks cleaner, lasts longer, but you’re spending $300-$600 depending on bus length.
Whatever you use, make sure it goes all the way to the ground and the seams overlap. Wind will find any gap. And leave yourself access to get under the bus — you don’t want to be tearing skirting off in an emergency.
One thing that surprised me when I looked into this — some people report that skirting alone dropped their heating fuel consumption by 20-30%. That’s a big deal when you’re burning diesel or propane all winter. The space underneath the bus goes from being an active wind tunnel to a relatively calm, somewhat insulated buffer zone.
Engine and Mechanical Prep for Cold Weather
Your living space is one thing. Your engine is another. And a bus that won’t start in winter is basically just a very expensive, very cold cabin.

Block heaters are the answer to the “how do you keep the engine warm” question. Most diesel school buses already have a block heater port from the factory. You plug it into 120V shore power and it keeps the coolant warm so the engine starts easy even in sub-zero temps. If yours doesn’t have one, a mechanic can install one for $100-$300. If you’re spending winters anywhere below 20°F regularly, it’s not optional.
Diesel fuel gels in cold weather. Below about 20°F, the paraffin wax thickens, clogs your fuel filter, and the engine won’t run. Either use winterized diesel (most cold-climate stations switch to winter blend automatically) or add an anti-gel additive. A $10 bottle treats a full tank.
Batteries hate the cold. A fully charged battery loses about 35% of its cranking power at 0°F compared to 80°F. If your batteries are old or weak, winter will expose that real quick. Test them before cold weather hits and replace anything that’s borderline. A battery tender plugged into shore power keeps them topped off and healthy. If you’re off-grid, make sure your solar is keeping up — shorter days and cloudy skies in winter mean less charging.
Check your coolant mix too. You want a 50/50 mix of antifreeze and water, which protects down to about -34°F. If someone diluted it or if it hasn’t been changed in a while, get it tested. An antifreeze hydrometer costs $5 at any auto parts store.
And while you’re at it, check tire pressures. Cold air contracts, so your tires lose pressure as temps drop. Low tires wear unevenly and handle poorly, especially on icy roads. Doesn’t matter if you’re not driving much, you still want proper inflation to protect the tires.
Condensation and Moisture Management
Alright, so this is the one that catches everybody off guard. You can have the best insulation, the best heater, skirting, the whole nine yards, and condensation will still find a way to make your life miserable if you don’t actively manage it.

Here’s what happens. You’re breathing, cooking, showering, even just existing inside a small sealed space. All of that puts moisture into the air. That warm moist air hits the coldest surface it can find — windows, metal framing, the emergency hatch — and it condenses into water. Literal dripping water running down your windows and pooling on your sills.
I was reading a forum post from a couple who spent their first winter in Oregon. They’d wake up every morning to water dripping from the ceiling above the bed. Not a leak, just condensation. Their spray foam was great on the walls but they’d left a section near the ceiling hatch with just Reflectix, and that’s where moisture was collecting. Took them weeks to figure out what was going on because they kept thinking it was a roof leak.
Ventilation is your primary weapon. Running a vent fan — even cracked open just a little — makes an enormous difference. Yes, you’re letting some heat out. But you’re also letting moisture out, and that tradeoff is worth it. A lot of people run their Maxxair or Fantastic Fan on the lowest setting 24/7 in winter. Barely affects the temperature but keeps the air moving.
Cooking generates a ton of moisture, especially boiling water. Use your range hood vent every time, or crack a window near the stove. Same goes for showers — a hot shower in a 250 square foot space puts an incredible amount of moisture in the air.
A small dehumidifier helps if you’ve got the power for it. The ones designed for RVs or boats pull a surprising amount of water out of the air. Some people collect a pint or more per day. That’s a pint of water that would otherwise be on your windows and behind your paneling.
Then there’s the simple stuff. Wipe down your windows in the morning. Use DampRid in closets and storage areas. Don’t hang wet clothes inside the bus to dry unless you’ve got a fan on them.
The reason condensation catches people off guard is that it’s not dramatic. Nothing breaks. Nothing stops working. It’s just this slow accumulation of moisture that leads to mold, musty smells, and rust behind your paneling. By the time you notice it’s a problem, it’s already been one for a while.
Where Do You Go to Get Away From the Winter, Cold?
This is probably the most popular strategy and it deserves a mention. A huge number of skoolie owners don’t winterize at all because they just leave. Head south in October, come back north in April. Arizona, Texas, Florida, the Gulf Coast — the snowbird circuit is well-traveled for a reason.

If that’s your plan, you still need to prep the bus for travel in cold weather. You might drive through cold states to reach warm ones. Keep anti-gel additive in the fuel and don’t let your freshwater system freeze during the drive. Some people drain their water completely before a winter move and refill at the destination.
But not everyone can chase warm weather. Jobs, family, land you own, whatever the reason — some people are staying put. And that’s completely doable. The people who’ve done multiple winters in a bus all say the same thing: the first winter is the learning curve. By the second one you’ve got your systems dialed and it’s honestly not that bad.
After going through all of this, here’s where I landed. Winter in a skoolie is a solvable problem, but it’s not a set-it-and-forget-it situation. You have to stay on top of multiple systems, you need redundancy in your heating, and you need to take moisture seriously from day one. The people who struggle are the ones who prep one or two things and skip the rest. Do the work before the first freeze and you’ll be fine. Wait until something breaks and you’ll be miserable. That’s basically the whole thing.